
Masking
Masks are used to block paint from areas where you don't want it to go. Military camouflage will often need masking. If the separation between colors is soft or fuzzy (depends on how the real thing was painted), camouflage can be free-hand airbrushed without masking. However, for sharp separation lines, or if spraying by paint can, masking will be have to be used.
Using the correct masking materials will
make your life much easier. The mask material must stick well to the surface,
but still be removable without disturbing any of the underlying paint. Masks
can be made with tape, film, or liquid.Not all tapes work equally well.
Of all the brands we've tried (many!), Tamiya masking tape works the best. This is a yellow tape, available at the hobby shop in various widths. It's a bit more expensive than regular white masking tape, but it can be removed without damaging your paint job. You can burnish down the edges with a toothpick or similar tool, to prevent paint "bleeding" under.
For masking large areas, we've had good luck with regular blue house-painter's masking tape from the hardware store.


Frisket film is also an excellent masking material (see photo below). It's available in art supply stores, sometimes in the stationery section of the local drug store. It's a low-stickiness, clear film, with a backing material that peels off. It is easily be cut with a hobby knife.
It comes in a large sheet, allowing you to cover larger areas faster than with tape. The main disadvantage is that it is not as flexible as tape, so for compound curves you can supplement it with masking tape.

Liquid masking films are very easy to use. The brand in the bottle shown above is Micro Mask. You just paint the liquid onto the surface with a brush, and when dry it forms a thin rubbery coating. Use a sharp knife to cut where needed, and discard the excess.
This is very handy for compound curves and surfaces with lots of protruding detail. We like to use it for masking the clear portion of canopies, to allow painting of the frame.Use a picture of the camouflage pattern of the full-size airplane to guide you.
A painting guide is included in many model kits.
For our sample model below, a photocopy of the pattern that came with the kit was taped to the top of the Frisket film.
Then the film was cut with a hobby knife. You could also get a sheet of glass (e.g. from a picture frame), then place overlapping strips of wide masking tape on it.
Lay the pattern over the tape and cut out the masks. If the color separation lines are soft, you can modify the masks to get the same effect. Use loops of flattened tape, or small pieces of "Blu-tac" to attach paper masks to the model.
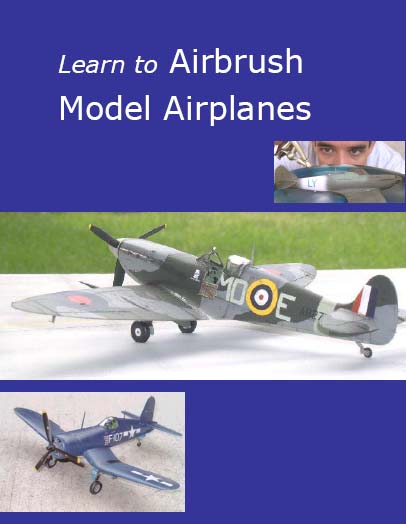
The small distance between mask and model will create the softer lines. The Spitfire below has been masked with transparent Frisket. If you look closely you can see it on the wing (the lighter gray areas).
Yellow Tamiya masking tape has been used in some of the more tricky spots. There is an area masked with liquid Micro Mask (blue area on top of fuselage, just in back of the cockpit).
Masking tape is also applied to the edges of the wing, and the underside of tail and fuselage; this prevents excess paint from the topside from reaching the bottom.

Camouflaged models require a bit of planning, and it's good to make notes on the sequence of colors. With notes you will avoid sudden confusion or mistakes when you have the model on your paint stand.
These are the painting notes for our spitfire (the "XF" numbers correspond to different colors of Tamiya acrylics):
1) Primer: XF54+XF21 (Dark Sea Gray + Sky, 50:50) "Medium Sea Gray".
1) b) Spot filler, touch-up primer.
2) Rear Fuselage Band, & Spinner: XF21 (Sky). Mask Off fuselage band.
3) Pre-shading: XF-1 (Flat Black)
4) Bottom color: XF54+XF21 (Dark Sea Gray + Sky, 50:50) "Medium Sea Gray". Mask
off.
5) Top color: XF54 (Dark Sea Gray). Mask with camouflage pattern.
6) Second top color: XF61 (Dark Green). Remove the Masks.When overlapping paint colors: paint the
lighter color first. If you try to cover a dark color with a lighter one,
it will require more paint than dark over light. This has the effect of
obscuring surface detail, and could create a fairly substantial ridge at the
very edge of the mask.After the 1st color is dry, apply the masks,
then spray the darker color. When the 2nd color is dry, carefully peel off
the masks, and prepare to be impressed!


Send us your comments below! Login with your Facebook, Twitter, Google or Yahoo account.